
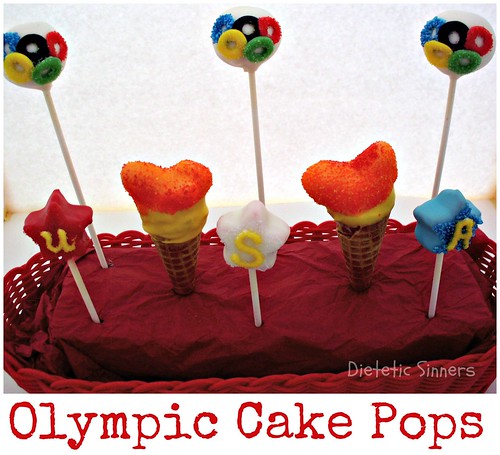
Last blogisode I presented my Olympic Cake Pops and showed you how to recreate the Olympic Torch in edible form. Today I'll show you how I made some Olympic Rings for my cake pops.

The base of the cake pop is the traditional cake mixture. I used pink lemonade cake and vanilla icing. I then shaped it into balls, inserted lollipop sticks and covered in white Candyquick chocolate. Easy-peasy!
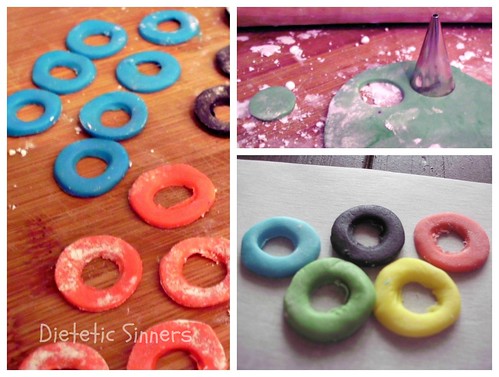
To make the rings I used marshmallow fondant (recipe at bottom of post). I colored small portions of the fondant with gel colors in red, black, blue, yellow and green. Tip: where gloves unless you want really colorful hands all day!
Roll out each color very thin, dusting with powdered sugar as needed to keep it from sticking all over the place.
Cut out small circles using a pastry bag tip. To cut out the centers I found a smaller circle using the cap of my gel food colors. Had to use a toothpick to get the fondant out of my cap when done but it worked very well for making my circles into rings.

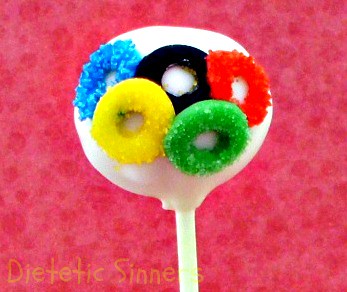
Let the rings dry a little bit to make them a bit easier to handle i.e. less sticky. Then using some light corn syrup "glue" the rings to your completely set cake pops.
if you want, after the "glue" has set, use some more on each ring to add some bling (sprinkles). Just do one color of sprinkles at a time waiting between colors for the previous color to set.
Using the corn syrup and marshmallow fondant made this project a breeze. I'll be using the technique again for sure!
Making these got me thinking about what the Olympic Rings mean. I always thought that each color represented something. After a quick look up on Wikipedia I found out they were created to represent "the five parts of the world which now are won over to Olympism and willing to accept healthy competition" and "the ring colours with the white background stand for those colors that appeared on all the national flags of the world at that time".
Well, now I'm all inspired up and ready to watch me some "healthy competition". How 'bout you?

Marshmallow Fondant
By Darla from Bankingdom
1-10.5 oz bag mini white marshmallows
1/4 cup (1/2 stick) butter or margarine
1 pounds confectioners' sugar, plus more for dusting
1-3 tablespoons water
Directions
Place the bowl in the microwave and cook for 30 seconds. Remove and stir thoroughly. Repeat these two steps until the everything is completely melted and well mixed.
If using a standing mixer, put half of the sugar in the bowl and pour the marshmallow mixture on top. Put the other half of the sugar on top of that and turn the mixer onto it's lowest setting. As it mixes, add 1/2 teaspoon at a time of water, as needed, to soften the mixture. Be careful not to add too much or it will get too sticky. Mix just until a dough forms.
If mixing by hand, leave the marshmallow mixture in it's bowl and pour half of the sugar on top. Move on to the next step.
Generously dust the counter top with confectioners' sugar. Pour the fondant mixture in the middle. Coat your hands in confectioners' sugar and sprinkle more on top of the mixture. If you are mixing by hand, this is going to be very sticky, but begin kneading the mixture and sugar together, generously adding the other half of the sugar to the mixture, as needed.
Continue kneading the dough until it is smooth and firm, adding more sugar to the counter top and hands, as needed. If the dough becomes to dry and tears easily, add a little water to soften it, being very careful not to add too much.
Lightly dust the fondant with confectioners' sugar and place it in a large zippered bag, squeezing out as much air as possible before sealing. Let it rest at room temperature at least overnight before using. You can use it right away on small projects, like covering cupcakes, but it will be too soft to do anything larger or to sculpt with.
This recipe holds well in the refrigerator for weeks, so it is helpful to make it ahead when you know you have an event or project coming up. If you make it ahead, just remove it from the refrigerator, allow it to rest, sealed and at room temperature, for at least 24 hours before using it.
To use your fondant, dust the counter top with confectioners' sugar. Place the fondant in the microwave for 10 seconds (no more) to soften it. Place on the counter and knead for a couple of minutes to soften further. Now you're ready to add color, roll it out, or start sculpting!
No comments:
Post a Comment